There are different methods to connect your phone to charging and use usb data at the same time:
- Connecting Power Source to Phone Battery pins directly (Without any battery)
- Connecting Power Sourceto Phone Battery pins directly and solder a resistor to BSI port (Without any battery)
- Using an old battery circuit part to connect power source directly to phone.
- Otg Cable With Charging
- Wireless Charging and Data at the same time
Method 1 : Connecting Power Source to Phone Battery pins directly
If you are lucky (if you have an old phone), an android phone can work with just soldering + and - sides of your power source directly to the battery pins.
Whatever your method is, do not use thin cables, use proper thick cables. With thin cables i had problems like reboots (at loading screen, phone reboots again etc)
For this you can use a 1$ lm2596 voltage regulator. (lm2596 can give 3A for short duration, for long usage it is suggested to not go over 2a and using a fan for continuous usages over 1A.)

To be on the safe side, it would be better to use a XL4015 voltage regulator which is around 2$ but could give up to 5A, and more stable for long usage.
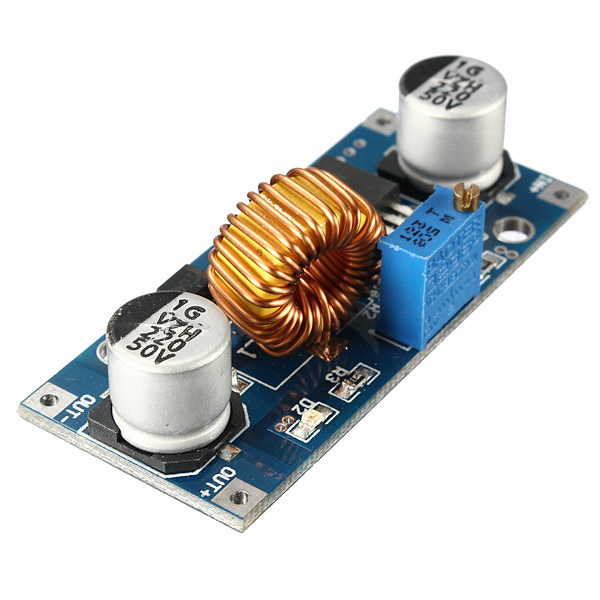
Tune output voltage between 3.6 to 4.2 volts. I tuned it to 4.1 volt. You can use a usb charger (choose at least a decent one that can give 2a at least, based on the phone you use), or directly connect the regulator to the 24v outputs of the ender3 power supply.
I first used a tape to fix the cables to phone pinout (just pull the cables a bit down to make the cables tight and tape it). Red cable is + (1st pin for galaxy s3), black cable is - (3rd pin for galaxy s3)


Later on i soldered the cables to the pin just to be sure. do not use too thin cables, use a decent one.
You could use your phone like a battery is connected. You could power off and on from power button etc. This method might not work with every phone model with removable battery:
Method 2: Connecting Power Source to Battery Pins Directly & Solder A Resistor to BSI Port

I tried it with a LG G3 and 40K was enough (voltage between ground and positive 3.8v, while BSI 3.6 volt) . My LG G3 phone trial failed but now i realised that it was either because of thin cables or bad usb charger. Better to use ender3 24 volt power supply.
Method 3 : Using an Old Battery Circuit to Connect Power Source
Newer phones uses all 4 ports of the battery and you can not make the software believe there is a battery connected. The easiest way is using the circuit of and old battery but you need to be careful:
- do not short circuit the battery. It is a lithium ion battery and can explode !
- Be gentle when removing the circuit. If you shear the metal plate from circut, which connects circuit to battery positive-negative sides, you might not be able to resolder it.

I am using my LG G4 without battery thanks to this method.
Watch this video for an example:
Method 4 : OTG Cable With Charging
Another method that allows for usb functionality and charging is using dock/audio stations if the phone supports it. I still don't like to use a phone with battery for long times, it might be dangerous !
It is easy to make a usb otg cable with charging by tricking the phone like it is connected to a station. I used 60k resistor using the diagram below. The only important part when connecting is that power needs to be connected first. I'm not so sure if this cable method works for all phone types. I know that there are kernels that support charging + otg for Nexus 7.

Also cut only the 5V + (red) cable between the phone and Ender3 for not to power the mainboard of the printer from phone. This way you would be sure that 3dprinter mainboard will be up only if its power supply is up.
If you do not have experince in soldering, soldering a microusb is not that easy, you could do a otg+charing cable using either a microusb male dip (which i could'n find, there is female version only on aliexpress) or male dupont cables like the one below:

Even those dupont cables might not have the 5th pin on the micro usb side unfortunately (mein was like that unfortunately), better solder microusb on your own.
Since your phone is going to be connected to plug all the time, you need to find a way to stop and start charging at certain levels. Fortunately there is a program for that (on rooted phones if supported) which could stop and restart charging a when it reaches or falls configured levels.
Installation link: https://play.google.com/store/apps/details?id=com.slash.batterychargelimit
I configured it to %65 and %20 to prolong the battery life to maximum.


Method 5 : Wireless Charging and Data At the Same Time
I haven't tried this method but in some forums i do read that you might be able to charge wirelessly if you set the USB debugging mode to "transfer files only" so it's being used as a data transfer cable, rather than both.


1 comments:
You can make 4 pins battery works. Connect 2 resistors to gnd.
I did that to 2 of my phones.
Post a Comment