Monday 21 September 2020

Ender3 Pro Direct Drive - Bullseye Mount

After installing klipper for quality, i wanted to convert my bowden Ender3 pro to a direct drive printer. I found the "speed drive v1" design made by "sashalex007" which mostly uses stock parts and he achieved a great result with 100mm/s wall speed. https://www.thingiverse.com/thing:3816051 

The part that i would not like about the design is that you loose some x space (not much) which lead me to search for the remixes at start, and i found 2 remixes that uses Banta mount design but at the end after having many problems decided to use the original design with some tweaks. 

For not to loose x space, you need to change Y motor with the extruder motor. Here are my  installation instructions: 

1. Some Ender3 devices  came with press fit pulleys on Y axis, so before starting the job, print a pulley extractor. 


I printed extractor with %100 infill (PLA) and it worked. But second time (when i'm using it for a friend) it cracked, so print 2 of them just in case. 

And if you own such an  Ender with a press fit pulley Y motor, you need to buy a 20 teeth G2 belt compatible 5mm diameter and 6mm width gear (since press fit ones can't be used again)


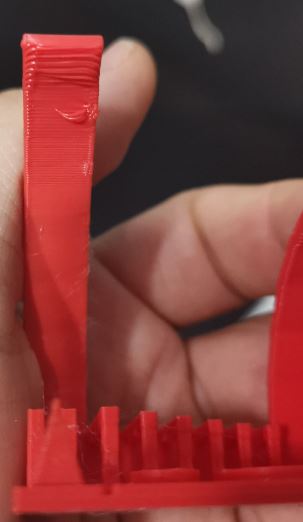
2. You need to print a leveling knob smaller than the default 60mm. When you change the Y motor with the larger extruder, the knob on back left side hits the motor just before touching the Y switch. 


3. You need 6 m5 washers (2 for each wheel), be careful to buy standard ones like in photos below. Outer diameter need to be small, otherwise it will touch to the moving parts of bearings and creates friction. Using the 6 washers you gain 1-2 mm and you need it, otherwise motor hits the vertical colums. 


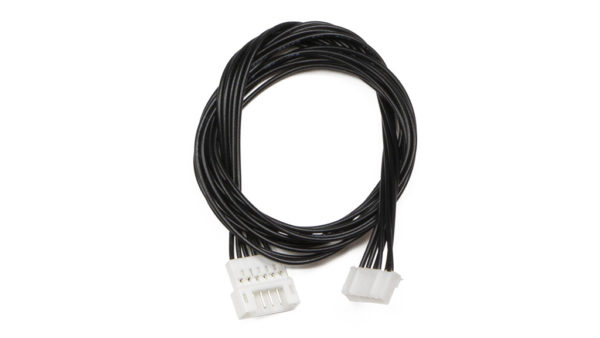
4. You need either a usb cable, than you can extend extruder cable by soldering it or you need a fabricated cable to extend extruder cable which is a lot easier ( 6pin female-male nema step motor cable) 
If you choose to solder yourself  be careful to mark the cables, otherwise you could solder it wrong.  Some usb cables have thinner cables for data, so check if they are too thin or not, use something good. After soldering, try moving the extruder motor from marlin menu but don't forget about cold extrusion prevention mechanism. Ender3 default marlin settings prevent you from moving the extruder motor when the hot end is cold. 


5. You need some plastic cable zippers to tidy cables. Below is the best cabling orieantation i could find which could reach the top right corner of the printer without cables passing inside the frame. 


6. You could use the stock fan or you could use a 24v blower fan with an adapter to mount it to Bullseye. 


7. You need to print speeddrive mount, bullseye base (From speeddrive page), and bullseye from its own page.  Read bullseye installation on it's own page (you will need m3 nuts and button head 12mm bolts for ender3 pro installation )


The good part about using bullseye is that extruder is easily reachable, and it is easy to level the duct bottom. During installation just use the wrench that comes with Ender3 Pro like below. 


You could also use Petsfang if you own a 5015 fan, like the guy here https://www.thingiverse.com/make:794919 


Testing 

Below 20mm test cube is printed with 100mm/s infill and 70mm/s wall speed, 1250 acceleration and at 0.2mm resolution using klipper (and settings are tuned for klipper). You could achieve higher values with a stable shelf, mein is a bit shaky. 


Cube test should not be your only method to evaluate. Print a micro 3d printer test object. Here are my results: 

You could do a water turbulence test to understand if  bullseye is mounted in right position: 


FAILURES 


If you also would like to check what i tried before being successful, you could read this part. I checked the designs below not to loose x space with speeddrive design: 

This design changes Y and Extruder motor (Y motor is shorter) which results in full X usage and lighter moving parts. And also the blower fan sits to banta mount without and adapter (e.g. to rotate a bit not to to hit the extruder )

This has an adapter that rotates the blower fan 45 degrees. 

First I chose to go with the first design and at the end succesfully had a direct drive. I then decided to do a printer test print and my result was not good (x cube looked ok !):  


I then did the water-turbulence test and saw that the cooling is misdirected (it is either wrong installation or there was a problem with the base bart design for banta mount, i don't know).


.I decided to go back to Bullseye but with an adapter and wrote this documentation :). 


Thursday 3 September 2020

Klipper On Android - Galaxy S3 - Ender 3 Pro


 I've succesfully installed klipper on my old phone Galaxy S3. If you haven't read  first part of this topic "Octoprint on Android" please read it, cause i'm assuming you already accomplished the tasks below: 

Prerequisites

  • Android with printer serial driver installed (ch341 serial driver for Ender3 Pro).
  • Debian installed on Android  (using Linux Deploy) 
  • Always on phone (Check my other posts for an always on phone

Setting Klippy-Env Python Version

Klipper needs newer python like octoprint as Debian Jessie is too old. Klipper creates a "klippy-env" folder when installing it, so creating a virtual-env and changing python version in advance helps overcoming problems: 
mkdir /home/pi/klippy-env
virtualenv --python=/usr/local/lib/python2.7.17/bin/python klippy-env
sudo apt-get install libffi-dev
sudo apt-get install git
source /home/pi/klippy-env/bin/activate

Check python and pip version inside virtualenv (python 2.7.17, pip 20.x)
python --version
pip install --upgrade "pip < 21.0" 
pip install --upgrade setuptools
pip install greenlet
pip install cffi
pip install pyserial

Installing Klipper

You could now start installing klipper (exit virtualenv first) 
deactivate
git clone https://github.com/KevinOConnor/klipper
You need to start installing using klipper scripts (Which is standard installation of klipper). 
/home/pi/klipper/scripts/install-octopi.sh

Klipper Configuration File

In service start file we show printer.cfg file location in /home/pi.  Copy the sample config file to "/home/pi/printer.cfg" and make it readable by any user so that octoprint can read it 
cp /home/pi/klipper/config/printer-creality-ender3-2018.cfg /home/pi/printer.cfg 
chmod 777 /home/pi/printer.cfg 
If you unplug and plug usb, sometimes serial connection changes from TTYUSB0 to TTYUSB1 (like below picture) so it is better to connect to device by its id.

Enable virtual-sdcard from scratch so that you could start printing from lcd screen, and it works faster since klipper is directly sending commands not octoprint to klipper and klipper to printer.

You are still not ready to start klipper, next action is compiling: 

Compiling Klipper for Mainboard

If you can not succeed compiling klipper on a phone, you could do it on a linux and then you could copy the "klipper" folder to your phone. If you don't compile it you won't have the necessary dictionaries etc. and you will have problems. In my case it seems like it was working but when i checked "/tmp/klippy.log", i saw errors of missing build.dict  logs. 

You need to compile klipper according to your printer board, which for my case ATMEGA 1284P 16Mhz for Ender3 Pro standart board (not the quiet one) 

cd /home/pi/klipper/
make menuconfig


then you need to "make": 


So if everything up to here is successful, start klipper and check for logs whether it works without any warning logs etc. Below commands clear log file, restart klipper and check it's status and log files: 
pi@localhost:~/klipper$ sudo rm -rf /tmp/*
pi@localhost:~/klipper$ sudo service klipper restart
Restarting klipper: klipperStopping klipper: klipper.
Starting klipper: klipper.
pi@localhost:~/klipper$ sudo service klipper status
pi@localhost:~/klipper$ cat /tmp/klippy.log


Binding Octoprint to Klipper

Before changing the firmware of your board we need to be sure of 2 things: 
  • klipper and octoprint services are running (above) 
  • Octoprint is connected to klipper 
So you need to bind octoprint to klipper as below: 


Next action is changing firmware of your printer and if klipper & octoprint does not work you will loose time either finding the problem or converting your printer back to Marlin.  

Flashing Firmware to Mainboard

To flash klipper to printer, you need determine the serial connnected port by its id. First determine the id: 
ls /dev/serial/by-id/*
It should report something similar to the following:
/dev/serial/by-id/usb-1a86_USB2.0-Serial-if00-port0
You can then flash klipper to printer. 
make flash FLASH_DEVICE=/dev/serial/by-id/usb-1a86_USB2.0-Serial-if00-port0
After flashing, connect your phone (Which klipper is active), and then restart klipper service. 

Fixing Permissions 

If you try connecting to printer, this time you would face an error like "/tmp/printer permission denied." Because symlinks are sticky in tmp folder and if you install octoprint and klipper with different users, octoprint can not reach it. Here is the enhancement link: https://github.com/KevinOConnor/klipper/issues/1902 

Possible solutions are:
- Remove sticky bit and make tmp folder permissions readable (i used this one) 
ls -ld /tmp/printer
sudo chmod a=rwX /tmp/printer
- Remove symlink protection (it is not possible in this debian version unfortunately) 

Temporary Files 

If temporary files uses too much space, at the end your 4gb image could fill and octoprint/klipper might stop working. Keep an eye on the octoprint main page, under upload file menu you could see the. 

Folders you need to erase are: 
  • /home/pi/.octoprint/logs/*
  • /tmp/*
  • /var/log/*

PYTHON SCRIPT 

 I created a python script  that clears all log files, restarts klipper and then change the permission of "/tmp/printer" links. ("sudo nano /home/pi/printer.py")
import os,time
os.system(r'rm -rf /var/log/*') 
print r'/var/log cleaned' 
os.system(r'rm -rf /tmp/*')
print r'/tmp cleaned'
os.system (r'rm -rf /home/pi/.octoprint/logs/*')
print 'octoprint logs cleaned'
os.system (r'service klipper restart') 
print 'klipper service restarted'
time.sleep(2)
os.system(r'sudo chmod a=rwX /tmp/printer')
print 'klipper tmp-printer chmod changed'
Then add a system button to restart klipper by using "system command editor" plugin.


I also recommend a Tplink smartplug and its octoprint plugin to remotely power on/off your printer (red thunder icon).